Tuesday, April 26, 2016

The Butcher, the Baker, the Candlestick Maker...

I awoke this morning to the horrendous smell of a puppy accident. Poor Lucy had been sick in her kennel. I opened all the doors and windows, but even after cleaning up the mess, the stench was so strong that I felt the sudden urge to flee. My mom and I rounded up the candles and lit them, and after about 30 minutes or so I could breathe freely again.
I also discovered that my mom's favorite candle's wick had been completely burnt out, and so begins this tutorial.
Today I will show you how to recycle a candle.

Materials:
-candle
-mason jar or any glass container
-butter knife
-cotton string
-hot glue gun
-pot of water
-another glass container

Making the thing:
1) Get your candle and scoop out the wax with a butter knife or spoon. Be sure to keep the little peice of metal at the bottom of the wick.
2) Put the wax in the glass container (not the one that will be the candle).


3) Put the pot of water on medium heat on the stove and place the container of wax in the water.
4) Let the wax melt completely.


5) Cut a peice of string to be the wick.
6) Glue the piece of metal that was at the bottom of the original wick to the piece of string.


7) Dip the new wick in wax and let it dry.


8) Glue the metal piece to the bottom of the mason jar.


9) Pour the melted wax into the mason jar.


10) Hold the wick straight up until the candle hardens.
11) Trim the wick to the length you want.
12) The end!

Monday, April 18, 2016

What time is it???

AAAAADVENTURE TIME!
My boyfriend's kitchen fridge has an appalling lack of magnets. Obviously, this must be fixed.

Materials:
-sticker
-magnet sheet
-scissors
-exacto knife


Making the thing:

It's pretty self explanatory.


And I made more :)
The end.

Behold, the Smiling Turd

I was going to make cake mix cookie, but I didn't remember to look up a recipe, so instead of delicious cookies, I ended up with vanilla pancakes. Though disappointed, I played around in the kitchen anyway and made a mini cake with a cookie cutter and some frosting.


I didn't eat it.

Wednesday, April 13, 2016

Treasure Chest

I made this about a week ago, but only covered the cardboard on Monday. I discovered that it had moved from its position on the table and into his room. It had a toy Batmobile in it.

Materials:
-cardboard
-scissors
-sequins or glitter
-paper
-Elmer's glue
-ruler (optional. i just eyeballed it and/or traced it, trimming as needed)
-tape
-marking utensil

Making the thing:
1) Cut the cardboard so that there are four pieces that look like this.


(make sure that the lengths and widths match up.)
2) Tape it!


3) Cut out strips of cardboard. This will form the top of the lid.


4) Tape em.


5) Attach the taped strips to the box.


6) Trace the open parts of the lid onto the cardboard.


7) Cut out.


8) Tape!


9) Drizzle some glue in the bottom of the chest.
10) Get your sparkles or sequins and dump them in. Shake the box to get full coverage.


11) Cover the sides with paper (I used double sided tape).
12) Cut out a big piece for the top. Make it so the ends are wider than the lid.
13) Tape it on and cut the ends like this:


14) Fold n' tape.


15) Trace a piece of paper to cover the sides and tape.


16) Trim it up and you are done!


(Now my little brother put a plastic scorpion and some pennies in it.)

Tuesday, April 12, 2016

I Chews You!

I have been slowly cleaning out my closet these past couple of weeks when I stumbled across a Star Wars shirt that my dad got me a few years ago. I loved the cartoon Wookie on the front, but sadly the shirt had gotten stretched out and I stopped wearing it unless I got lazy with the laundry. Couldn't bear to throw the little guy out, so I made him into a cuddle buddy.

Materials:

-shirt
-scissors
-pins
-needle
-thread
-stuffing

Making the thing:
1) Cut out the character.
2) Flip the character over and trace the edge of the fabric onto the remaining shirt.
3) Cut out the outlined shape.
(forgot that I didn't need to pin just yet)


4) Flip the fabric so that the wrong sides are out.
5) Pin.


6) Stitch around the edge of the figure (I used a running stitch), but be sure to leave a gap to put the stuffing in.
7) Remove the pins.


8) turn the fabric inside out.


9) Put the stuffing in! Make them cuddly. Or stuff it with rocks. I dunno. Your stuffed animal, your decision.


10)Pin the open end.


11) Stitch it up.


12) Done!
13) (optional) Give it to your nerd boyfriend.


Lucy wanted it.

Sunday, April 3, 2016

Nicholas: Uncaged

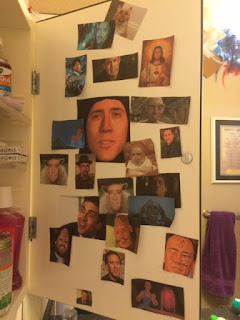
For April Fool's Day, I graced my home with various renditions of Nicholas Cage's face.
He's a terrible actor, but his face is a gift to this world.


I put this handsome fellow on one of the sliding doors to my dad's closet.
It was at his eye level.


A beautiful collage for the inside of my sister's medicine cabinet.


And now for the family photos with my friend Nick.


Aaaaand the extra surprise in the shower...


Man I love this holiday.