Monday, March 28, 2016

Origami Fish

This is probably my favorite foldy animal. I make it for little kids when they are upset and it buys about 5 minutes of calm, which is priceless.

Materials:
-paper
-pen or pencil
-scissors (optional)

Making the thing:


:)

Sunday, March 27, 2016

a note on sketching

Sketching is really relaxing to me, so I thought I would share my most recent sketch with you.


I drew this this past Friday in Carlsbad, California. I love going to the cliffs and finding cool rocks and shells, peering into the tide pools, and building sand sculptures with my boyfriend. Since he was at work that day I got to sit and get a little sunburnt while scribbling with a sharpie.
This was my view:


As you can see, my sketch is far from perfect. Luckily I have learned not to care about perfection in my sketches, or I would have been sitting on that rock for hours.
When sketching landscapes like that, I try to give a sense of depth through overlapping and difference in the size of the objects. The features or objects closest to you should be bigger than the ones farther away. You can also use marking and detail to create the illusion of space in the sketch. I tried to make the lines thicker toward the bottom of the page, and the top of the page had thinner lines.

Sunday, March 20, 2016

Coke Vase

For all those kitschy American diners in need of centerpieces.

Materials:
-coke bottle
-duct tape
-red yarn
-white flowers
(and I didn't end up using the lace)


Making the thing:
1) Tape the end of the yarn to the top of the bottle.


2) Wrap the top of the bottle.


3) Stop at the white line.


4) Cut the yarn and tie it off, cutting or tucking in the tail.


5) Repeat steps 1-4, starting at the bottom.


6) Stuff with white flowers.


Done!

Multi Level Pot

I got to do a pot for my coil project in ceramics!


(That's my teacher, Mr. Bangsund. He's cool.)

About the thing:
I have been wanting to start a garden for a while now, but plants shrivel when I walk by, so I'll start small. The pot is about 10 inches tall and 5 inches wide, and the coils are about as thick as my thumb. I used a slip and score method when layering the coils on top of each other (as were my teacher's instructions). I blended the inside walls enough to be smooth, but I didn't worry about making them perfect because they would be filled with soil. Dirt doesn't care what the container looks like.
Assuming that it survives the kiln, I am going to glaze it with a dark green or rust orange.
Not sure what plants to put in it yet. Feel free to make suggestions!

Nails!

Warning:
I suck at nails.

Materials:
-nail polish
-a toothpick
-nail clippers
-nail polish remover
-cotton swabs

Making the thing:
Honestly it's pretty self explanatory.


Clean up the nail with the nail polish soaked cotton swabbed and you're good.

Sunday, March 13, 2016

Dog Chew Toy

Since I made a cat toy last week, I thought it was appropriate to make a dog toy this week.

Materials:

-scissors
-lots of rope

Making the thing:
1) Take about 5-6 feet of rope and cut them into three lengths.
2) Fold them all in half.


3) Tie a knot in the center.


4) Cut the folded ends.


5) Spread the ropes out.
6) Tie a rope from one side of the knot to the other side.


7) Repeat until all of the ends have been tied.


8) Take one rope and tie it around the bunch of rope at one end.


9) Repeat with every rope until each has been tied around the bunch.


10) Braid the ends and tie knots at the ends of the braids.


11) Repeat with the other three strands.
12) On the other side of the knot, do steps 8-11.


13) Breathe a sigh of relief with the knowledge that you haven't spent $10 on a toy.
14) Play tug-of-war with your dog!


Well....

The toy lasted about 12 hours. The cat loved it.


The dog loved it even more

Monday, March 7, 2016

Hickory Dickory Dock

The mouse ran up the clock.
The clock struck one and I decided to make a toy mouse for the cat, Dinah

Materials:
-catnip
-felt
-embroidery thread
-embroidery needle
-scissors
-marking utensil
-stuffing


Making the thing:
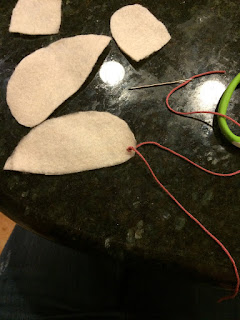
1) Draw two teardrop shapes on your fabric. Make one of the long sides straight. This will be the body of the mouse.
2) Draw two semi circles for your mouse ears. (I ended up trimming mine to be smaller).


3) Cut them out.


4) Thread your needle (I needed much more thread than pictured above, I just kept tying more lengths on as I ran out).
5) Leaving a long tail (for the tail lol), tie a knot at the end of the thread and stitch it through the rounded end of one of the body pieces. The knot will be on the inside of the mouse.


6) Whipstitch the body along the bottom (flat side).


7) Embroider the nose.


8) Tie it off and cut the thread, with the knot on the inside of the mouse.
9) Embroider both eyes.


10) Take your ears and stitch each of them onto the mouse.


11) (Optional) Embroider the ears to fill them in.


12) Whipstitch the top of the mouse, leaving a gap to put the stuffing in the toy.


13) Get the catnip and stuffing (I used shredded toilet paper), and stuff the mouse.


14) Stitch it up.


15) To make the tail, tie the ends of the thread together repeatedly until you have the desired tail length. I wanted it to be longer, so I had to tie more thread on.


16) Laugh at your cat while they toss the toy around.